Facebook Instagram Pinterest TeachersPayTeachers BlogLovin Home Image Map
Showing posts with label free downloads. Show all posts

November 28, 2012

Santa's Christmas Cookie Slam! Card Game

I fell completely in love with these cute Christmas Cookie graphics from Scrappin' Doodle and just knew I could find several ways to use them!  Here's a fun game I created for following directions and language processing.  It's called:


The download includes these cookies...


 ...and these playing cards...


...for some fast-paced fun!  This is a great little game for a whole variety of skills.  You could use it for articulation practice, practicing giving directions, following directions and language processing, just to mention a few.  I'm thinking my kids will LOVE it!  In fact, I'll probably send a few copies home with kids as homework.  (P.S.  Update:  I've played this several times today and it was a major hit!)

Do you want to play, too?  You can download this game here.  I've been using this game as is, but you might want to make two copies of both cards and cookies to extend the length of the game (not to mention the laughter!)

'Tis the Season!


Pam

November 8, 2012

Stomp, Skip, Spin!

I just loved KPM Doodles Basic Monster set so much, that I had to find something else to make with them.  The result:  Stomp, Skip, Spin! It's an action game for working on articulation skills.  Just print out the game, cut out the cards and you're ready to go.


These are the Action Cards; Cut them apart and lay them face down on the Game Board.
These are the SP set of the Word Cards.  There is also an ST and a SK set included in the download, as well as a page of blank ones for you to customize.  Print, cut them apart and lay them face down on the Game Board.

This is the Game Board; Put the Action Cards in a pile, face down of the Action Card Draw Pile space, and the Word Cards in a pile on the other draw pile space.
To play, the child draws one card from the Action Card pile and lays it on the Action Card Discard pile, and one card from the Word Card pile and lays it on the Word Card Discard pile.  The child performs the action on the Action Card while saying the word on the Word Card.  Here's the great part:  You get to choose how you want him/her to say it (ex. word, phrase or sentence) and how many times he/she has to repeat it.  So it might look like this:  "Say the word "space" 5 times while you skip around the room."  Easy!  And fun!  I've only played it once so far, but we had a blast and the child asked if we could do it again next week.  That qualifies as a success in my book!  I'm already thinking of other  ways to use this game.  Wouldn't it be fun to make an obstacle course and have the kids draw a new set of cards before each obstacle, skipping or spinning or tip-toeing to the next one?  Hmmm.  I'll let you know if it works.  But in the mean time, if you want to play this game, too, you can find it in my TpT Store. It includes target cards for F, S, SH and CH in the initial and final positions.


Have fun!


Pam

November 2, 2012

Pumpkin Stew

Halloween may be over, but I am still all about pumpkins!  I love them!  I'm so glad I can use them in my Thanksgiving activities, too.  Guess what I'm whipping up now???  A big batch of Pumpkin Stew!


I made up this little rhyme to use with my S-Blend kiddos, but I think it can be adapted to work for almost any of my kids.  Yesterday, I grabbed a big bowl, a wooden spoon, two plastic pumpkins and a variety of play food items.

Yes, I know they're jack-o-lanterns and it's after Halloween...it's all I had!


We put the pumpkins in the green bowl as we said "Pumpkin Stew.  Pumpkin Stew."  Then we rubbed our stomachs as we said "Mmmm, I like it.  Yes I do!"  Next, we shook the salt shaker and pretended to add salt to the stew as we said "Salt and Pepper".  Then the child chose an item from the blue bowl and added it to the stew as we said (for example) "Pizza, too!"  Finally, we took the spoon and stirred up the stew while we said, "Stir, stir, stir my pumpkin stew!"  The kids loved it!  They caught on to the rhyme very quickly and were eager to put in all the food items I had chosen.

I plan to use this with my little ones working on CVC combos and two-syllable words next week.  I want to make it easy for them to repeat this activity at home, so I that's why I made the printed version.  I recruited my son to draw some the graphics for me (isn't he amazing???? He did the pot, spoon and salt shaker).  It sure is nice to have an in-house graphics designer, let me tell you!  That is, when I can pin him down.  The pumpkin came from KPM Doodles, and the boarders from Scrappin' Doodles.


I will send home a set of picture cards and a copy of the the rhyme and the pot.  The child can choose a picture to put in the little frame on the rhyme page prior to starting the rhyme.  As they recite the rhyme with their parent, they can add it to the soup pot and pretend to stir it in.

Here's an example of the picture cards I will use with my S-Blend kids:


I made these at LessonPix.com.  Do you know about LessonPix?  I came late to the parade and just found out about them last week.  How did I not know about them???  Anyway, it is an amazing site where you can create materials using their graphics in just a few minutes.  It has a sound finder feature that lets you enter in the sound and place in the word and then displays all the graphics that match.  You can quickly choose the ones you want, and then turn them into cards with just a click of the mouse.  Amazing.  However, it is not a free site; you do need to purchase a membership.

Do you want to make Pumpkin Stew, too?  If so, you can download the rhyme and stew pot here.  Just be sure to let me know what you think about our original creations :-)  (Can you tell I'm a proud mama?)


Pam

October 24, 2012

Fall Flip Book for S-Blend Practice


Last week I posted a little Halloween Flip Book that was extremely popular with my readers.  I was surprised by it's popularity, as it was something I made years ago and hadn't pulled it out in a few years.  But as I saw how much the kids enjoyed using it this past week, I decided to create another one.  This one is specifically designed to be used to work on S-Blend words and phrases, as I have several little buddies who struggle with those skills.  I haven't had a chance to try it out yet, but basically I plan to use it just like the Halloween one.  The stack of pictures on the left side of the book are adjectives as in the Halloween Flip Book, and the stack on the right are objects/people.  The words on all the picture cards begin with S-blends, which include SP, SL, SM, ST, SK and S.  Most of the adjectives pair up with at least one object that makes sense, but it is fun to talk about why when they don't.  There are twice as many adjectives in this set than objects so you can be selective.  If you'd like to use this little book too, you can download it here..  I recommend that you print it on photo paper if you have it.  It's my little trick for not needing to laminate!

Enjoy!

Pam

P.S.  I love receiving your comments!

October 16, 2012

Halloween Flip Book for Adjectives

Here's an oldie-but-goody that I pulled from my Boardmaker files:  a Halloween Flip Book  for working on adjectives.


It's a fun little book with a stack of adjective cards on the left, and Halloween vocabulary on the right that you flip through to make plausible and silly combinations.


I like to have the kids turn to the first page and say, "I see a scary haunted house," and then have them flip over the next vocabulary card to see if the next item is also scary.  For example, the second card might be a picture of candy, so I ask them, "Is candy scary?  No!"  Sometimes we continue flipping through the whole vocabulary stack and sometimes we just find one more thing to match the adjective, depending on the child.


Sometimes when we turn over an adjective and an object that do not match, such as a yummy moon, I will ask the child to tell me a better word to describe the moon.

There are all sorts of ways to use this fun little flip book.  Would you like a copy? If so, you can download it here.  Instructions are included, and it goes together quickly so you could use it today!  Helpful hint:  print it on card stock or photo paper for better print quality and durability.

Here's a sample of my vocabulary cards:


Have fun and please let me know what you think.  Your feedback is always appreciated!

Pam


October 10, 2012

Halloween Bugs Book and Craft for Preschoolers

I just love Fall and Halloween, can you tell?  There's so much fun to be had!

One of my favorite books for toddlers and preschoolers is Halloween Bugs by David Carter.  The kids just can't seem to get enough of this little lift-the-flap book!  Even my elementary school-aged kids love it.  Each page features a unique lift-the-flap door with a bug-in-disguise hiding behind.  Some of the bugs pop out, some have crazy hair, and some are just plain silly.  Another feature I love is that it has repetitive-line text.   Each page asks, "Who's behind the _____ door?"

I'm using it this week to work with young preschoolers who are working on building two-word phrases and/or consonant-vowel-consonant (CVC) words.  I can easily change the text to suit whichever goal I'm working on.  For example, instead of using "Who's behind the door?", I might say "Knock knock!" to target a CVC word.  Before I allow the child to open the door, I might have him say "Open door"  or "red door" to target a two-word phrase.  Depending on what we find behind the door, we can say a descriptive CVC word, and we can say "bug".  Before we close the door again, we can say "Bye Bug".

Download this page to make the Knock Knock Paper Bag Book
I made a little activity to go along with this book that my students can take home with them.  It's a book whose pages are made from paper lunch sacks!  This is how I did it.  I cut out the "Knock Knock!" squares and the Halloween graphics from the printout you can grab here.  I used darling graphics from Scrappin' Doodles to make it.


I stacked four paper lunch sacks and cut off the top 3-4'' and then stapled them together.


I glued one "Knock Knock" square on the first paper sack, and a red rectangle door that I cut from card stock on top of the bag bottom, which is like a flap.


I lifted the flap and glued the moon graphic under the flap, and then flattened the flap to close the door. I like to let my graphics peek out a bit from behind the door to give the kids a hint to what they might find when they open it.  Repeat for the remaining pages.  You could change the colors of each door if you want, or you could just draw a door shape using a marker if you don't have time to cut and paste on doors.  In fact, I've been drawing doors on the flaps all week and it's actually worked out better.  You can make the doors "spooky" by letting the child put Halloween stickers on them, too.  That's it!  Super easy, and super fun.

You could do a variation of this book with older kids, too.  Just think up a repetitive line that will work with your goals, and write it with a marker on each page.  If you're working on adjectives, you could let your students make the doors be dusty, sparkly, spooky or whatever you decide.  You could have the kids make bugs to hide behind the doors, just like in the book, and you could embellish them with yarn, paper shreds, googly eyes, etc.  Or, check this out:  I grabbed this cute memory game made by Carrie at Carrie's Speech Corner last week from Pinterest.  Thanks, Carrie!  You could hide these cute trick-or-treaters behind your doors!  Language opportunities abound!

I hope you find this idea as much fun as I do!


Pam

October 5, 2012

A Spooky Spooky Story

How about a cute, spooky tale to get you in the mood for Halloween?  I made this cute little book using graphics from Scrappin' Doodles and would love to share it with you!

It's a 7-page rhyming book with a pop-out ghost at the end that is sure to charm your little ghosts and goblins.  All you have to do is print it and cut out the pages and you're ready to go.


The pop-out ghost is the best part of this spooky little tale.  Just fold a strip of paper accordion-style, glue one end to the ghost and one end to the "Boo" page. He will pop right out when the "door" page is turned.

If you'd like to download a copy, you can grab it here.

I've used this little book in lots of ways.  It's great for vocabulary, and perfect for practicing /sp/ blends.  You could also make this a more hands-on activity for your students by letting them make all the pages of their books.  Just enlarge the graphics and text, cut them out individually (not as pages, just graphics or blocks of text) and let your kids glue them to blank pages cut from card stock.  Like this:


What do you think?  Will you use it?  Tell me how!


Pam

May 23, 2012

Goin' Buggy!


We're goin' buggy here at Small Talk this month!

This is one of my favorite themes.  There is so much to do! My office is transformed into a garden, and there are bugs hiding all around.  I bought The Fairy Garden Hideaway from Hearthsong a few years ago and hung it from a hook on my ceiling.  I spread the sheer green netting from corner to corner, making my office feel like we are hiding in and under a garden...like bugs!  The kids all love it and think it's a magical place to be.  One of their favorite things to do is decorate foam butterflies to hang from the canopy.  You can find foam butterflies, flowers and bugs at your local craft store.  I like to use the smaller pieces to cover up target word pictures to work on articulation.  The child removes a flower sticker from the page and practices the word hiding under it.  You can do this activity to work on language goals, too.  When the butterfly is complete, I let the child show me where he or she would like their butterfly displayed.  We talk about the colors of the butterflies on the canopy, and use location words, such as above, below and next to.  The children return each week delighted to find new butterflies hanging on the canopy.


Another fun and easy project to do is to make a bug with Crayola Model Magic modeling material.  Gather up some googly eyes, pipe cleaners and foam leaf stickers and you're ready to go.  Model Magic is a great material if you've never tried it.  It is soft and easy to work with, and yet it is not sticky or messy at all.

I made a set of 6 sequence cards for the kids to follow to create their own bugs.  Several of my kids are working on comparatives, so several of the steps include concepts such as short vs. long, flat vs. round, and large vs. small.   Here is what they look like.

Here's an example of a bug made by a student, using foam leaf stickers for the wings.  This activity lends itself well to creating many language opportunities.  I've learned a lot about bugs this week, too.  I was taught by a second grader that real insects have THREE body parts, not just TWO, like my activity suggests.  Sigh.  They always keep us humble, don't they?

If you'd like a copy of my sequence cards to build your own bugs, you can grab them here.  Don't panic if you find them out of sequence in the document...They are all there!

One last easy little activity I'd like to share is this one.  I purchased this cute bug boarder for bulletin boards at Lakeshore.  I cut a piece in half, and folded the circles like an accordion.  I cut out some circles, pasted a bug jar on each, and stapled the circle to the first bug circle "page".  It looks like this:


 I have used this little book to work on a whole host of different goals.  We've worked on vocabulary (ex. names of insects, body parts), 2- word phrases (black bug, pink bug, yellow bug) and descriptors.  I've used it with my early elementary kids who are using the Expending Expression Tool (EET) with great success, focusing so far on the group name (ex. bugs or insects) and then on "Do" (ex. "What does a ladybug do?).  Next week we'll be moving on to size, shape and color to add to our bug descriptions.  If you're not familiar with the EET, you should learn about it.  It is a fantastic method for improving language skills developed by an SLP.  Check it out here.

There.  That should keep you busy for awhile!

Nice chatting with you!

Pam


May 18, 2012

Tapikeo HD App 80% off Today Only!

Check it out!  Anyone who knows me knows that I LOVE the Tapikeo HD app!  It is on sale today for 80% off it's usual price of $2.99 at the app store.  You've gotta get this one if you don't have it already. Check out some of my earlier blog posts to see how I've used it and to download some free templates:

Template for In, On and Under

Movement Story Idea

Move and Talk Story Templates

 Have fun!


Pam

May 8, 2012

Ideas for Home Projects Using Tapikeo HD App

I'll admit it...I just can't get enough of my Tapikeo HD app!  I've been using it with my families for "homework" projects.  Let me tell you how.

The first activity is one that I've been doing with my itty-bitties.  It's called "Where's Mommy?" and I use it for working on family member names, vocabulary building, and early concepts.  I also use it for my CAS kids at the VC level in the Kaufman program.  I send them home with the instructions to take pictures of various family members demonstrating the concepts I want to teach, as well as close-up pictures of each family member.  After I receive the photos from the family, I import them into a Tapikeo grid.  I made a grid as a template, which you can download at the end of this post, to help me organize my story.  This is what the grid looks like:


The words and the background color in each cell of the template disappear when a new photograph is added, so you can put a picture of Daddy in a cell that has a different family member's name and no one will ever know!  As I said, the template is just to help me organize my story.  You can add your own words to each cell by typing in the "text" box.  My kids love this story, and it generates a TON of language.

If you would like to use this template, you can download it here:


The next idea I'd like to share is to make stories about individual concepts.  Here is one Charlie and I made together.  I made the orange slide using Microsoft Word and saved it as a PDF.  I imported it to my iPad, and then used it as the first cell of a new story.


Then Charlie and I used objects around my office to demonstrate the concept of "between".  I took photos of him directly from the app (as I've explained in earlier posts) and then recorded Charlie using the word "between" in a sentence.


Press "new" to take a picture, then record voice.
Charlie said, "The bear is between my arms."


We completed seven different examples of demonstrating "between" for this story, and then played it back.  Charlie was so proud and really learned the concept well.   I  exported this story to his iPad at home, and asked him and his mom add to it using items from around his house.  I can't wait to see what they add!

I made a generic "cover page" for this story that you can download here if you want to make one, too: My Story of "Between".


Another great idea:  Charlie's mom purchased this app and promptly put it to use to work on his articulation skills.  She knew we were working on the /l/ sound in the final position of words, so she and Charlie found objects around their house and made a story of Charlie saying words that end in /l/.


I hope you're using this app.  It has so many amazing possibilities!

Nice chatting with you,

Pam


April 26, 2012

Is There a Doctor in the House?

Feel Better Frog from Manhattan Toy
We're learning all about doctors and nurses here at Small Talk this week, so what better time to bring out another one of my favorites:  Feel Better Frog!  If you're not familiar with this toy, let me fill you in.  This poor little frog is not feeling well, but has all the accessories to help him get better in no time!  He sneezes or blows his nose when you hold the tissue to his face, slurps soup off the spoon, and tells you if he has a fever or not when the thermometer is in his mouth.  He even tells you when he's hungry!  Kids and parents alike find this toy hilarious and engaging. I usually add my Fisher Price Doctor Kit to the mix, and then we can check poor Froggie's ears, give his a shot or two and listen to his heart.  Playing doctor is a great way to introduce new vocabulary and practice lots of language goals!


To go along with this theme, I made a Patient Chart using Boardmaker.  We talk about who the patient is, what happened to him, what we did to make him feel better, and what instructions we gave him to do at home.  I help the child complete the chart by showing him a page of choices for each question on the chart.  We review/name each of the choices and select one to put on the chart.  When the chart is complete, I have the child tell about the patient he treated, using the chart as prompts.


For example, the child might say, "Teddy Bear came to the doctor today.  He fell off his bike and hurt his knee.  I put a bandaid on it.  I told him to go home and rest."

If you'd like to download my charts and choices, you can find them at these links:  Chart ChoicesChart Choices 2 and Patient Chart.  Sorry for the multiple downloading, but I posted these before knowing how to link PDF's together in one file.  Oh well, they're free, right?

Another great way to work on sequencing, vocabulary and language skills is to make an interactive story of the child pretending to be a doctor using your iPad or iPhone.  There are several great apps that allow you to take photographs within the app itself and then use them to create a story, but the one I used today was Stories 2 Learn by MDR.  It's easy to use and a story can be completed quickly.  Check it out in the App Store.


Just take a picture of the child using your iPad or iPhone, or import a photo from another camera.  Add the text by typing in the text box, and audio if you desire.  Save your page, and add another.  Your story can be as long or as short as you want it!  The pages of the story look like this:


Kids just love to be the stars of their own stories, and this is a great way for them to work on their speech/language skills, too!

Nice chatting with you!

Pam


April 10, 2012

Move and Talk: Story Templates for Tapikeo HD

Last month, I shared with you how I used the Tapikeo HD app to create an interactive activity in one of my treatment sessions.  Many of you showed interest in that particular activity, so together with Takikeo's developer, Jean-Eudes Lepelletier, I created a couple of free templates for treatment activities to share with you.  These templates have been made available on Jean-Eudes' website and Facebook page and right here on my blog!

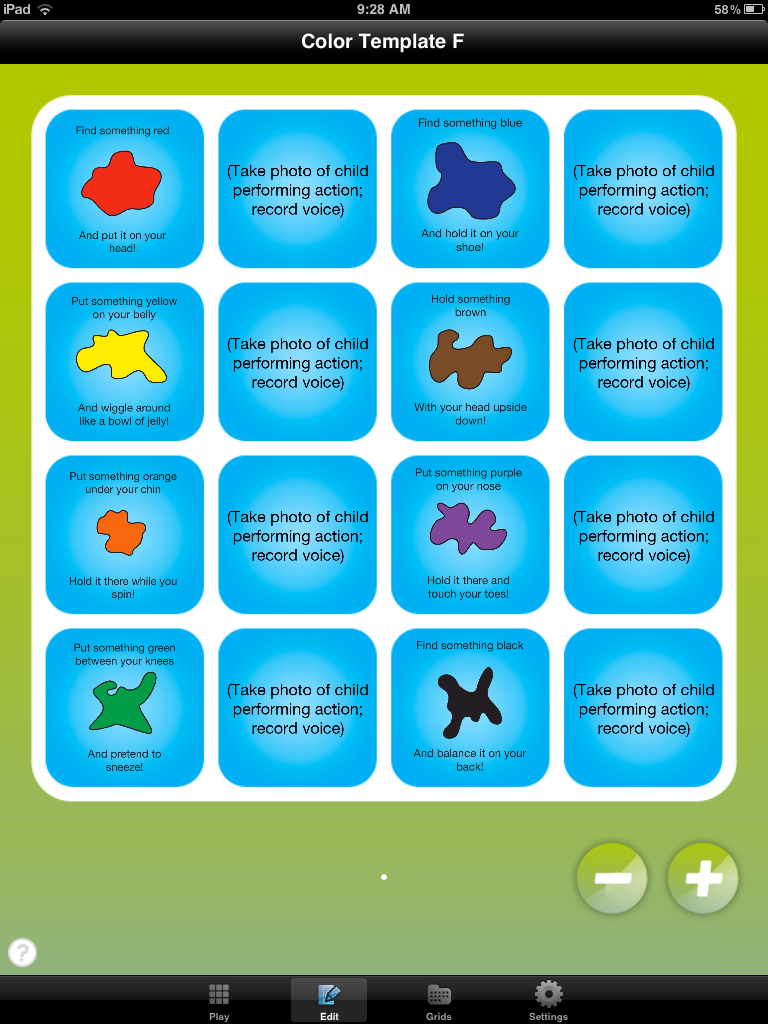
The first is called Move and Talk: Colors.  It is a little story that incorporates following directions, colors and movement, and can be customized to target specific speech and/or language goals.  This is how I use it:

Move and Talk: Colors Template as it appears when you download it onto Tapikeo HD

After downloading the grid from the server and opening it in my Tapikeo app, I am ready to make it my own.  First, I find it in the "Your Exports" section of the Grid Manager.  I select "Import", which moves a copy of the template to the "Your Grids" section of the Grid Manager.  I select the template then go to Grid Settings to rename this story.  Then I press "done" and am ready to create my story.  Next, press "Select and Play, and then press "edit", which you will find at the bottom of the screen.

Cell 2 - Customization
Cell 1 - Direction for the Child


I show the child the first cell, and read the text.  While the child finds a red object, I touch the second cell.  (By the way, I usually collect objects of various colors beforehand and keep them in a large basket that is accessible to the child.  This saves a bunch of time!)  I touch the "new" button to take a picture of the child performing the action.  This photo will become page 2 of our story and will replace the text or photo that appears in this cell as a template.  I then ask the child to say a target word, phrase, or sentence, and record him or her saying it.  For this example, the child said "Red on my head", because we were working on using the final /d/ sound.  We play it back to review, and if we are satisfied, I touch "done", which takes us back to the main grid.  I repeat this sequence for each of the colors in the story until it is completed.

Example of a  template cell in Play Mode
Example of a customized cell in Play Mode


When all the cells are completed, you are ready to play back your story.  Touch "play" at the bottom of the screen, and touch the blinking cell in the upper left corner of the grid.  That's it!  Easy!  And completed in less than 15 minutes.

The second story is one I use with my /r/ kids, to increase the level of difficulty while they practice saying target words in phrases and sentences.  It is called Move and Talk: Final AR.  This is what it looks like:

Move and Talk: Final AR Template

 Use this template in the same way as described for the Move and Talk: Color story, except record the child saying the target phrase or sentence as directed in the story.

Move and Talk:  Final AR grid with photos added


Template text disappears when you add a photo to the grid;  Add your own text by typing it in during the customization process.


So what do you think?  Do you like these?  If so, you can download one or both of them here (once you purchase the Tapikeo HD app):

Move and Talk: Colors
.tpk file:  http://bit.ly/MoveWithColorsTpk
web version:  http://bit.ly/MoveWithColorsInternet

Move and Talk: Final AR
.tpk file:  http://bit.ly/MoveTalkFinalAR_Tpk
web version:  http://bit.ly/MoveAndTakFinalAR_Web


If you don't already have the Tapikeo HD app, now is a great time to get it, because the 3.0 version is just being released.  You can purchase it through the App Store today!

I'd love your feedback on these templates.  I've been enjoying using them with my kids, and their parents absolutely love them!  I've got some other ideas in the works too; let me know if you want me to share them.

By the way, can you tell I just love Tapikeo HD?  It can be used SO MANY different ways with every child and family on my caseload.  The possibilities are endless!  A HUGE thanks to Jean-Eudes for creating this fabulous treatment tool!

Nice chatting with you!

Pam