Facebook Instagram Pinterest TeachersPayTeachers BlogLovin Home Image Map
Showing posts with label speech language treatment ideas. Show all posts

January 14, 2016

Playing in Mud Puddles: Word Games


The winters in Oregon are long, filled with damp, grey days and plenty of rain. All that rain and lack of sun can make me feel sluggish and lazy. It certainly dampens my creativity! But one thing that never fails to cheer me up and gives me some inspiration is a trip to my favorite toy store, MudPuddles Toys and Books located in Sherwood, OR.

MudPuddles is a wonderful, independent toy store filled to the brim with the latest and greatest toys and books. Kate, the owner of this fabulous place, has a knack for finding toys that are appealing, fun, durable and educational. She pours her love of learning through play into her shop and is more than happy to introduce shoppers to her latest finds. It's a fabulous place and I love to explore it!

My most recent trip to MudPuddles was inspirational. As I browsed through the store, it occurred to me that I should write a post (or posts) about my new toy/game finds and how I might use them in speech and language treatment. And so, this toy/game review series, Playing in Mud Puddles was born!

I could spend all day and night telling you about all my favorite finds, but I decided that since this will be a series of posts, I will feature a specific category of toys/games in each post. I am devoting this first post to word games, because I am, admittedly, a Word Nerd, and I love them!


First, I want to tell you about two awesome games I found from an educational game company called Think Fun.  I love this company! They make quality, entertaining games that are so appealing and addicting! Their slogan is "empowering minds through play," which is totally in line with my philosophy.

The first is called Word Around and is great for kids ages 8 and up.


Each card has three words on it, one spelled out sequentially in each ring. Players race to identify the word on the ring that matches the color on the back of the previously played card. The trick is trying to figure out where the word starts, identifying it and saying it before the other players do. Can you identify the words in the picture above?

Blue ring = bottle
Red ring = regular
Black ring = asleep

I actually purchased this game and brought it along when I went to visit my mom. She is aging and starting to experience some memory issues. She loves puzzle games like Sudoku, but I feel strongly that she should challenge herself with word games as well. I wasn't sure how she would do with this one, with the time pressure of competing with another player, but she really did well! She caught on quickly (which isn't always the case for her when learning something new) and really enjoyed it. She liked it so much that I left it there with her in Ohio to play with family and friends.

IF I had Word Around here with me in Oregon (I plan to purchase another copy on my next trip), I would use this game with my upper elementary, middle school and high school students.  I would use it to target:


  • vocabulary - specifically parts of speech. I would have the student name the part of speech after identifying the word. For example, "bottle is a noun."
  • sentence formulation - have the students use the words they identify in sentences
  • synonyms, antonyms, multiple meanings - have the student choose 5 words and have them name a synonym, antonym or tell multiple meanings
  • working memory - many of my students process information at a slower rate than what is typical. I love to use competitive games like this to target processing speed.
  • word skills - I have several students who struggle with games like anagrams (i.e. changing the letters of a word around to make other words)
  • articulation carryover - I might use this for rapid rate production of carrier phrases for /r/ or /s/. At the end of the round, I would have the student say "I can read bottle" or "I see asleep" for each of the cards in his/her pile.
  • social skills - winning/losing, good sportsmanship, turn taking

The second game I found is called Pathwords Jr.


It's a word search puzzle game where kids find the words of each puzzle and cover them with brightly colored shapes to create a pattern.


There are four different levels of play, from beginner to expert.  Some of the puzzles show a list of the words to find,

and some give picture clues or hints, making the puzzles more challenging to complete. Each puzzle has a theme and is often in the shape of an item related to the theme. For example, the puzzle pictured above has music-themed clues, and is shaped like a musical note.


I purchased this game and have been happily using it with my mid-to-upper elementary and middle school students.  I've used it target

  • categories
  • inferencing
  • vocabulary
  • verbal reasoning
  • problem solving
  • spelling
The kids love this one and so do I! 

The third word game I want to tell you about is called Xoom Cubes by a company called Baxbo, who describes this game as "a thousand word games in one." Players complete challenges by creating words from their letter dice. There are two levels of challenge cards, regular and junior.


I purchased the junior deck, and here are some of the challenges:


There are letter races, category races, timed games and potluck, which is a challenge to create as many words as you can find with your dice.

I did not purchase the complete game that included the letter dice, for two reasons: first, I am on a tight budget and already knew I was buying the other two games, and secondly, I have letter tiles from Bananagrams that I figured I could use instead. I am all about repurposing what I already have! So, I combined the Xoom Cube Jr. cards with the Bananagrams tiles and it worked just fine.


Here's how I've been using them:

I spread about half of the letter tiles on a non-slip mat in the center of the table. I positioned a bell within reach of each player. I read a challenge card to the players, who then raced to complete the challenge, ringing the bell when they finished. The first player to collect 5 challenge cards was the winner!

I used this game to target the same skills that I listed above for the Think Fun games. What I like about this one though is that students have a greater opportunity to generate the words used in the game. We've had many discussions about the words they have chosen to spell ("No, LOL is not a real word, it's an acronym, so choose a different word to spell.") and what those words mean. It gives me insight into what topics are important to them as well (Star Wars, Mine Craft, music).

Moving on...


One of my favorite sections at MudPuddles is the collection of little toys in bins at the front of the store.  Something always catches my eye, and I always come away with a small treasure.  I want to feature one of these treasures each month, too.  I'm calling them Little Droplets that Make a Big Splash! These items will be inexpensive (less than $5.00) but very useful and fun.


January's Little Droplet is one that my friend, Jenny (who just happens to work at MudPuddles) cringed at when I picked it up. It was an expandable plastic tube for $1.99. She said, "Pam, you do NOT want that! It's so LOUD and ANNOYING!" But then, I showed her that this accordion-style tube is just perfect for providing auditory feedback. You just stretch the tube, bend it into a crescent, hold it up to your mouth and ear, and then say a word.  She was amazed! She promptly showed her co-workers this new way to use this toy.  I bought several to use with my articulation kids, and they are a hit!  Not only do the kids love shaping the tube into the right size for them, they are learning to use auditory feedback to help shape their production of sounds.

So there you have it.  Didn't I come away with some great finds??? I can't wait to go play in MudPuddles again soon.

Oh, by the way, I should say that the items chosen to be reviewed for this post were completely my idea, inspired by how they might work for me in my clinical setting.  No toys or games were given to me free of charge, nor was I given a promotional fee. The opinions regarding these products are expressly my own.

A BIG thanks to Kate and Jenny at MudPuddles for so graciously allowing me to hang around in their store and showing me such cool things! If you'd like information on any of the things I featured today, shoot them an email or give them a call. I know they would be happy to help! Just click here.

November 2, 2012

Pumpkin Stew

Halloween may be over, but I am still all about pumpkins!  I love them!  I'm so glad I can use them in my Thanksgiving activities, too.  Guess what I'm whipping up now???  A big batch of Pumpkin Stew!


I made up this little rhyme to use with my S-Blend kiddos, but I think it can be adapted to work for almost any of my kids.  Yesterday, I grabbed a big bowl, a wooden spoon, two plastic pumpkins and a variety of play food items.

Yes, I know they're jack-o-lanterns and it's after Halloween...it's all I had!


We put the pumpkins in the green bowl as we said "Pumpkin Stew.  Pumpkin Stew."  Then we rubbed our stomachs as we said "Mmmm, I like it.  Yes I do!"  Next, we shook the salt shaker and pretended to add salt to the stew as we said "Salt and Pepper".  Then the child chose an item from the blue bowl and added it to the stew as we said (for example) "Pizza, too!"  Finally, we took the spoon and stirred up the stew while we said, "Stir, stir, stir my pumpkin stew!"  The kids loved it!  They caught on to the rhyme very quickly and were eager to put in all the food items I had chosen.

I plan to use this with my little ones working on CVC combos and two-syllable words next week.  I want to make it easy for them to repeat this activity at home, so I that's why I made the printed version.  I recruited my son to draw some the graphics for me (isn't he amazing???? He did the pot, spoon and salt shaker).  It sure is nice to have an in-house graphics designer, let me tell you!  That is, when I can pin him down.  The pumpkin came from KPM Doodles, and the boarders from Scrappin' Doodles.


I will send home a set of picture cards and a copy of the the rhyme and the pot.  The child can choose a picture to put in the little frame on the rhyme page prior to starting the rhyme.  As they recite the rhyme with their parent, they can add it to the soup pot and pretend to stir it in.

Here's an example of the picture cards I will use with my S-Blend kids:


I made these at LessonPix.com.  Do you know about LessonPix?  I came late to the parade and just found out about them last week.  How did I not know about them???  Anyway, it is an amazing site where you can create materials using their graphics in just a few minutes.  It has a sound finder feature that lets you enter in the sound and place in the word and then displays all the graphics that match.  You can quickly choose the ones you want, and then turn them into cards with just a click of the mouse.  Amazing.  However, it is not a free site; you do need to purchase a membership.

Do you want to make Pumpkin Stew, too?  If so, you can download the rhyme and stew pot here.  Just be sure to let me know what you think about our original creations :-)  (Can you tell I'm a proud mama?)


Pam

October 10, 2012

Halloween Bugs Book and Craft for Preschoolers

I just love Fall and Halloween, can you tell?  There's so much fun to be had!

One of my favorite books for toddlers and preschoolers is Halloween Bugs by David Carter.  The kids just can't seem to get enough of this little lift-the-flap book!  Even my elementary school-aged kids love it.  Each page features a unique lift-the-flap door with a bug-in-disguise hiding behind.  Some of the bugs pop out, some have crazy hair, and some are just plain silly.  Another feature I love is that it has repetitive-line text.   Each page asks, "Who's behind the _____ door?"

I'm using it this week to work with young preschoolers who are working on building two-word phrases and/or consonant-vowel-consonant (CVC) words.  I can easily change the text to suit whichever goal I'm working on.  For example, instead of using "Who's behind the door?", I might say "Knock knock!" to target a CVC word.  Before I allow the child to open the door, I might have him say "Open door"  or "red door" to target a two-word phrase.  Depending on what we find behind the door, we can say a descriptive CVC word, and we can say "bug".  Before we close the door again, we can say "Bye Bug".

Download this page to make the Knock Knock Paper Bag Book
I made a little activity to go along with this book that my students can take home with them.  It's a book whose pages are made from paper lunch sacks!  This is how I did it.  I cut out the "Knock Knock!" squares and the Halloween graphics from the printout you can grab here.  I used darling graphics from Scrappin' Doodles to make it.


I stacked four paper lunch sacks and cut off the top 3-4'' and then stapled them together.


I glued one "Knock Knock" square on the first paper sack, and a red rectangle door that I cut from card stock on top of the bag bottom, which is like a flap.


I lifted the flap and glued the moon graphic under the flap, and then flattened the flap to close the door. I like to let my graphics peek out a bit from behind the door to give the kids a hint to what they might find when they open it.  Repeat for the remaining pages.  You could change the colors of each door if you want, or you could just draw a door shape using a marker if you don't have time to cut and paste on doors.  In fact, I've been drawing doors on the flaps all week and it's actually worked out better.  You can make the doors "spooky" by letting the child put Halloween stickers on them, too.  That's it!  Super easy, and super fun.

You could do a variation of this book with older kids, too.  Just think up a repetitive line that will work with your goals, and write it with a marker on each page.  If you're working on adjectives, you could let your students make the doors be dusty, sparkly, spooky or whatever you decide.  You could have the kids make bugs to hide behind the doors, just like in the book, and you could embellish them with yarn, paper shreds, googly eyes, etc.  Or, check this out:  I grabbed this cute memory game made by Carrie at Carrie's Speech Corner last week from Pinterest.  Thanks, Carrie!  You could hide these cute trick-or-treaters behind your doors!  Language opportunities abound!

I hope you find this idea as much fun as I do!


Pam

September 28, 2012

Using YouTube Videos in Treatment: A Toy Train in Space

I stumbled upon the most wonderful video yesterday on YouTube.  It's called A Toy Train in Space.


It's a wonderful little video made by a father about his son's favorite train, Stanley.  Together, father and son attach Stanley to a weather balloon and launch him into space.  A video camera captures Stanley's journey to the stratosphere and back to earth, while father and son track him on their computer.  There is very little dialog, if any, but the fabulous video footage and editing/animation tell a very engaging story that's sure to delight kids young and old.  I've used it several times already this week with great results.  After viewing the video, my kids have asked wonderful questions, such as "What is the stratosphere?" and "How did they make Stanley's face move?" which lead to rich discussion and research.  View this video for yourself here:

I can see using this video with my youngest to oldest kids on my caseload.  One way I used it this week  for my older kids working on the /r/ sound was to make a list of words that might be used to retell the story in the video that contain the /r/ sound.  Then, I made a template for them to use to generate the story sequence and to use the target words in sentences.  It looks like this:


You can download my worksheet here.

I've got some more ideas of ways to use this video, but I've got to create the materials before I share them with you.  Check back in a few days!

Nice chatting with you,

Pam

August 30, 2012

Treatment Tricks: Introducing Structure to Young Preschoolers

I've got a little one on my caseload that's just turning three.  He's highly entertaining and loves anything with wheels.  He's a little buddy who demonstrates characteristics of Childhood Apraxia of Speech, and is very self-conscious about imitating speech sounds or words for me during our sessions.  I've been working with him for approximately 10 months, and during that time his vocabulary has grown from less than ten words to well over 100.  Most of our treatment time has been child-directed, which you would expect with a two-year-old.  Most of my attempts to introduce activities with specific targets have been met with a strong, emphatic, two-year-old "NO!"  He's using several word shapes, his vowels are mostly accurate, he's got most of the early developing sounds in his repertoire, and he's producing 3-4 word sentences.  However, as his language complexity increases, his intelligibility of speech decreases, making things more frustrating for him than ever.  So what's a girl to do, to get a little compliance?

I threw caution to the wind and decided to make a plan for a little structure.  And guess what?  It actually worked!  Even better than I'd hoped it would!  I'll share it with you now.


First I found three little boxes to "hide" activities in.  I made them appealing (I hoped!) by putting vehicle pictures on them.


Each box contained either an entire activity or a piece of an activity that I had prepared but wouldn't fit in the box, and a paper vehicle with velcro on the back.


The vehicles each had velcro dots on them to attach two wheels.  One of my targets was the word "wheel", as he is learning to make the /w/ sound with rounded lips.  During this sequence of activities, he had many opportunities to practice that word.

I displayed all three boxes on the table and let him choose which one we would open first.  I removed the other two from the table, and together we opened the box.  He removed the paper vehicle, and I showed him that we would put it on the road that I had displayed on the back of my bench after we played a game with the other item or items in the box.


One of the targets of the day was words beginning with the /h/ sound.


Inside the box he found six items to practice words that begin with /h/:  hat, horse, heart, hop, hot and high.  We said the words as we removed them from the box, again when we played with them, and again when we put them back in the box.

When the activity was completed, we put the wheels on the vehicle (after he said "wheel" of course) and then put the vehicle on the road.  By the way, my choice of vehicles was also planned ahead of time.  he uses a generic "word" (wah-we-oh) to refer to all emergency vehicles, so I chose police car (pees car), fire truck (fa ya tuk) and garbage truck (ga ba tuk).  He made great attempts to imitate all three with very little reluctance.  After putting the vehicle on the road, we chose another box.

My little buddy loved this format.  I was hoping that maybe we'd get through two boxes, but we actually completed all three!  Success!  Smiles all around.  I wonder if it will work next time...?

What are your tricks for working with young preschoolers?  I'd love it if you'd share!


Pam

July 31, 2012

Camp Journal: Olympic Champion Badge

Here's an example of the Olympic Champions Badge page of a Camp Journal.

We completed three activities:  Making a torch, painting the Olympic Rings (see previous post) and earning Olympic Medals.

This child is working on naming members of a group and their functions as part of the EET program.  As he collected foil to decorate his Olympic torch, he named 8 things he would see at a birthday party.  As he decorated his torch, he needed to describe two things each item does.  For example, he named "Balloons" as something he would see at a birthday party.  Then he said, "you hold them, you punch them and make them go back and forth".

Our next task was to name 8 items in each of 5 categories; you can find a photo of that activity in my previous post.

Our Olympic Competition was the highlight of the day.  The kids attempted to earn bronze, silver and gold medals by completing a task that contained one of their goals.


I used cards from Jenna Reyburn's Speech Room News Olympic Activity Pack to make my own Olympic events.  I wrote the names of different activities on the back side of the medal cards.  Kids selected a card from the Gold Medal, Silver Medal and Bronze Medal piles to determine what "event" they needed to "compete" in.


For example, this child selected the Amazing Ball Skills card, and had to say one of her target words or phrases before hopping over the block with the ball between her knees.  Once she said all 10 words/phrases correctly, she earned a medal.


The Sandwich Stack event required the child to say her target words to earn pieces of a large fabric sandwich.  After earning 8 pieces, she had to walk across the room and back with the sandwich balanced on her head.  I'd say that's Bronze Medal worthy, wouldn't you?

After completing the tasks listed in their journals, the kids were awarded the Olympic Champion Badge, which they glued on the page.  My little Olympians really enjoyed their speech time today!


Be creative and have fun,

Pam

May 8, 2012

Ideas for Home Projects Using Tapikeo HD App

I'll admit it...I just can't get enough of my Tapikeo HD app!  I've been using it with my families for "homework" projects.  Let me tell you how.

The first activity is one that I've been doing with my itty-bitties.  It's called "Where's Mommy?" and I use it for working on family member names, vocabulary building, and early concepts.  I also use it for my CAS kids at the VC level in the Kaufman program.  I send them home with the instructions to take pictures of various family members demonstrating the concepts I want to teach, as well as close-up pictures of each family member.  After I receive the photos from the family, I import them into a Tapikeo grid.  I made a grid as a template, which you can download at the end of this post, to help me organize my story.  This is what the grid looks like:


The words and the background color in each cell of the template disappear when a new photograph is added, so you can put a picture of Daddy in a cell that has a different family member's name and no one will ever know!  As I said, the template is just to help me organize my story.  You can add your own words to each cell by typing in the "text" box.  My kids love this story, and it generates a TON of language.

If you would like to use this template, you can download it here:


The next idea I'd like to share is to make stories about individual concepts.  Here is one Charlie and I made together.  I made the orange slide using Microsoft Word and saved it as a PDF.  I imported it to my iPad, and then used it as the first cell of a new story.


Then Charlie and I used objects around my office to demonstrate the concept of "between".  I took photos of him directly from the app (as I've explained in earlier posts) and then recorded Charlie using the word "between" in a sentence.


Press "new" to take a picture, then record voice.
Charlie said, "The bear is between my arms."


We completed seven different examples of demonstrating "between" for this story, and then played it back.  Charlie was so proud and really learned the concept well.   I  exported this story to his iPad at home, and asked him and his mom add to it using items from around his house.  I can't wait to see what they add!

I made a generic "cover page" for this story that you can download here if you want to make one, too: My Story of "Between".


Another great idea:  Charlie's mom purchased this app and promptly put it to use to work on his articulation skills.  She knew we were working on the /l/ sound in the final position of words, so she and Charlie found objects around their house and made a story of Charlie saying words that end in /l/.


I hope you're using this app.  It has so many amazing possibilities!

Nice chatting with you,

Pam


April 10, 2012

Move and Talk: Story Templates for Tapikeo HD

Last month, I shared with you how I used the Tapikeo HD app to create an interactive activity in one of my treatment sessions.  Many of you showed interest in that particular activity, so together with Takikeo's developer, Jean-Eudes Lepelletier, I created a couple of free templates for treatment activities to share with you.  These templates have been made available on Jean-Eudes' website and Facebook page and right here on my blog!

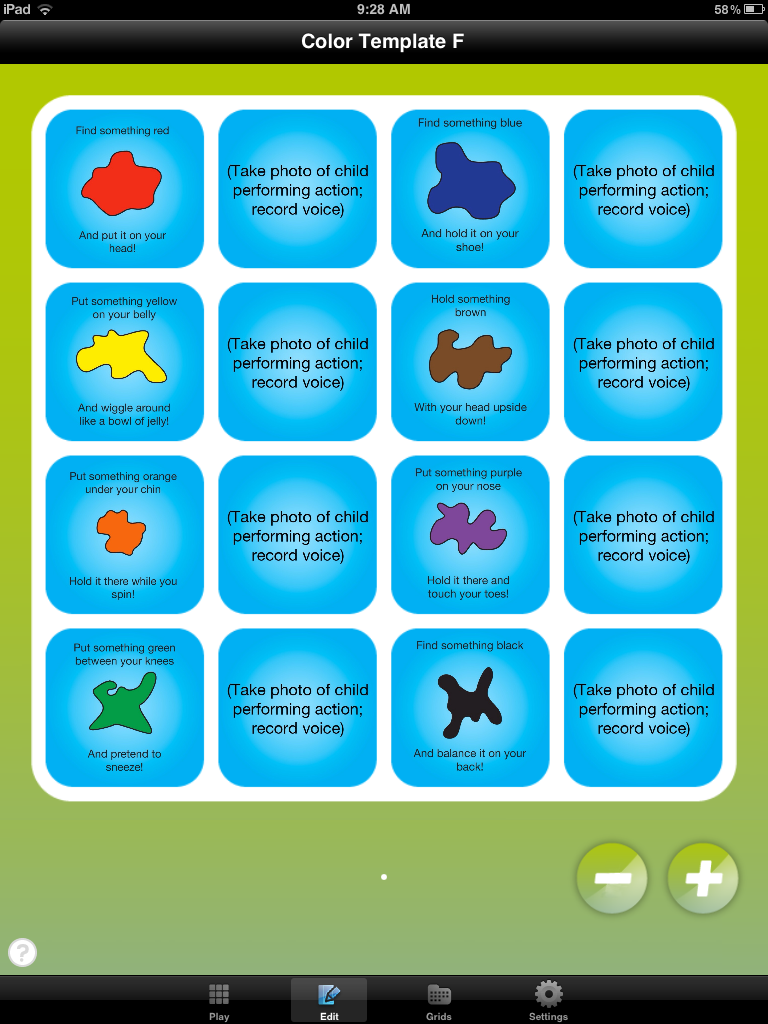
The first is called Move and Talk: Colors.  It is a little story that incorporates following directions, colors and movement, and can be customized to target specific speech and/or language goals.  This is how I use it:

Move and Talk: Colors Template as it appears when you download it onto Tapikeo HD

After downloading the grid from the server and opening it in my Tapikeo app, I am ready to make it my own.  First, I find it in the "Your Exports" section of the Grid Manager.  I select "Import", which moves a copy of the template to the "Your Grids" section of the Grid Manager.  I select the template then go to Grid Settings to rename this story.  Then I press "done" and am ready to create my story.  Next, press "Select and Play, and then press "edit", which you will find at the bottom of the screen.

Cell 2 - Customization
Cell 1 - Direction for the Child


I show the child the first cell, and read the text.  While the child finds a red object, I touch the second cell.  (By the way, I usually collect objects of various colors beforehand and keep them in a large basket that is accessible to the child.  This saves a bunch of time!)  I touch the "new" button to take a picture of the child performing the action.  This photo will become page 2 of our story and will replace the text or photo that appears in this cell as a template.  I then ask the child to say a target word, phrase, or sentence, and record him or her saying it.  For this example, the child said "Red on my head", because we were working on using the final /d/ sound.  We play it back to review, and if we are satisfied, I touch "done", which takes us back to the main grid.  I repeat this sequence for each of the colors in the story until it is completed.

Example of a  template cell in Play Mode
Example of a customized cell in Play Mode


When all the cells are completed, you are ready to play back your story.  Touch "play" at the bottom of the screen, and touch the blinking cell in the upper left corner of the grid.  That's it!  Easy!  And completed in less than 15 minutes.

The second story is one I use with my /r/ kids, to increase the level of difficulty while they practice saying target words in phrases and sentences.  It is called Move and Talk: Final AR.  This is what it looks like:

Move and Talk: Final AR Template

 Use this template in the same way as described for the Move and Talk: Color story, except record the child saying the target phrase or sentence as directed in the story.

Move and Talk:  Final AR grid with photos added


Template text disappears when you add a photo to the grid;  Add your own text by typing it in during the customization process.


So what do you think?  Do you like these?  If so, you can download one or both of them here (once you purchase the Tapikeo HD app):

Move and Talk: Colors
.tpk file:  http://bit.ly/MoveWithColorsTpk
web version:  http://bit.ly/MoveWithColorsInternet

Move and Talk: Final AR
.tpk file:  http://bit.ly/MoveTalkFinalAR_Tpk
web version:  http://bit.ly/MoveAndTakFinalAR_Web


If you don't already have the Tapikeo HD app, now is a great time to get it, because the 3.0 version is just being released.  You can purchase it through the App Store today!

I'd love your feedback on these templates.  I've been enjoying using them with my kids, and their parents absolutely love them!  I've got some other ideas in the works too; let me know if you want me to share them.

By the way, can you tell I just love Tapikeo HD?  It can be used SO MANY different ways with every child and family on my caseload.  The possibilities are endless!  A HUGE thanks to Jean-Eudes for creating this fabulous treatment tool!

Nice chatting with you!

Pam

March 30, 2012

My Five Favorite Games

During one of the online continuing education courses I viewed, the presenter showed a photograph of a speech language pathologist standing in front of a WALL of board games.  The caption asked, "Are you THAT therapist?"  I had to respond, "YES I AM!!!!"  I LOVE playing games!  I use them all the time during my treatment sessions.  No shame there!  They keep kids engaged and offer a higher level of difficulty in which to practice their new skills.  Here's my top 5:


1.  Cariboo by Cranium

Kids never tire of playing with this game.  Six colored balls are hidden inside the game.  The child searches for the balls by drawing a card and finding a door that matches the color, number or letter on the card.  The child then opens the door using a key.  If there is a ball under the door, the child places it in the hole that leads to the treasure chest.  After all 6 balls are found, the treasure chest "magically" opens!  Sheer delight, over and over and over again!  I use this game to work on a whole host of goals: plurals, speech sounds, sentence formulation, requests, turn taking, etc.  I've even changed the pictures on the doors by placing my own picture cards over the top of the others.

2.  Richard Scarry's Busytown: Eye Found It!


This one's a large board game that needs to be played on the floor.  Kids take a trip through Busytown on their way to have a picnic on Picnic Island.  Along the way, they stop and search for items hidden all over Busytown.  Some hungry pigs threaten to ruin the picnic by eating some of the picnic food during the journey...can we make it there before they eat it all?!  It's a different journey each time we play.  Great fun, and language opportunities abound!


3.  Froggie Boogie


Blue Orange Games make wonderful, colorful all-wooden games that I can't seem to get enough of!
This is one of my favorites.  Those sneaky baby frogs are trying to make their way around the pond while the mommy frogs are napping.  Kids roll the color dice, find a mother frog that matches the colors, and look under one googly eye.  If there's a frog on the eye, the mother "caught" them and they have to stay on their lily pad.  If the eye is blank, they can hop forward to the next lily pad and take another turn.  I use this one for articulation, color matching, turn taking, and language skills.


4.  Cat and the Hat I Can Do That

This is an excellent game for incorporating movement into speech and language activities.  The yellow "trick-a-ma-stick" is set up on the floor, and a variety of Cat in the Hat inspired objects are displayed on the table.  The child turns over three cards which give him a direction to complete.  The first set of cards state an action to be performed, the second tells which object to use, and the third tells which body part to use.  For example, a direction might be, "Step over the trick-a-ma-stick with the cake on your head."  I adapt this to work on various levels of direction following, from simple to complex.
 5.  Snail's Pace Race

This is another one that can be adapted in a multitude of ways.  Snails race against each other across the board to reach the finish line.  The child rolls the color dice to see which two snails get to inch forward one space each turn.  The unique thing is that the SNAILS are the competitors, not the people playing the game.  There are no winners or losers!  I mostly use this game with my preschoolers, but even the 10 year olds love the suspense of the race!

So there you are.  Fun, fun, fun!

What are some of your favorites?  I'd love to hear, so leave me a comment.  And then I might have to take a trip to Target...

Nice chatting with you!

Pam